Modifying tour settings
Within the tour properties window, there are several different options to allow you to customise your tours
Tour Information
- Destination: Specify the tour title or holiday destination.
- Start Date: Set the tour departure date. Remember to update the accommodation arrival date if the tour departure date changes.
- Nights: Enter the overall duration of the tour in nights. Note that this can differ from the accommodation duration for tours with overnight travel.
- Change: Click this option to modify the tour start date and duration. Refer to later instructions for more details.
- Tour Type: Choose between Inclusive Tour, Excursion, or Shuttle. Excursions and shuttles do not include accommodation, so passenger selling prices are defined in the day excursion fares group on this tab.
- Seat Plan: Select the seat plan style. Use "NONE" for open selling without seat assignments. Seats can be allocated later as a separate process.
- Seats: Specify the seating capacity, which automatically matches the seat plan style.
- Country: Define the geographic boundary as British, European, or Worldwide.
- Reserved: Reduce the effective number of seats available for sale. Please note that there is a separate feature for blocking out individual seats.
Route Selection

- Route Type: This setting is configured only during creation and displays the routing methodology in use, either Interchange or Point-to-Point.
- Outward - Primary: Select the primary outward route.
- Outward - Secondary: Select the secondary outward route (applicable only to interchange-based routing).
- Return - Primary: Choose the primary return pickup route from the drop-down list.
- Return - Secondary: Select the secondary return route (applicable only to interchange-based routing).
Region Settings:
- Resort: Specify the destination resort
Shared Resources:
- Accommodation: Tours operating on the same dates can share accommodation resources. Use this field to define the reference of the tour this departure will share with. The default is the tour's unique reference provided on the Departure Dates tab. Click the selector to choose the desired master tour.
- Keep Own Price: Enable shared accommodation tours to be priced individually. This is useful when self-drive and coach tours share the same accommodation pool. It applies to basic prices only, not supplements.
- Tour Options: Optional extras, such as theater tickets, can be pooled similarly to shared accommodation. Define the reference of the tour this departure will share with. Click the selector to select the required master tour.
- Seatplan Master: Check this box if this tour will operate as a master seat plan for other tours.
- Master Tour: Use the provided selector to choose a tour that will function as this tour's master seat plan. The selected tour must be configured as a seatplan master (refer to previous settings).
- Stop: Click this button to stop a tour from sharing a seat plan. (This option is active only when a tour is currently sharing a plan).
Further documentation on sharing resources is available [here]
Status Flags
- Accommodation Override: Check this box to override accommodation stock controls, allowing overselling of rooms. Use this option only when unlimited accommodation is available.
- Seat Numbers Off: Check this box to switch off seat numbering. Passenger seat assignments will still be made but won't be shown on confirmations, travel documents, or tickets.
- Off Sale: Check this box to withdraw the tour from sale. New bookings will not be allowed.
- Tour In Build: Check this box to indicate that the tour is newly created and not yet available for sale.
- Passport Required: Check this box to indicate that a valid passport is required for this departure.
- Issue Insurance Voucher: Check this box to have t3 issue a voucher of a value determined by the selected insurance band.
- Self Drive Tour: Check this box to indicate that no coach element is required for this tour.
- Trust Account Finalized: Check this box when a trust certificate has been printed. No further completion certificates will be printed for this tour to prevent double accounting of tour revenue.
- Margin Scheme VAT: Check this box if the tour is subject to the Tour Operators Margin Scheme for VAT, splitting the revenue analysis on cash daybook reports.
- Hitlist/Guaranteed To Operate: Check this box to denote that the tour is guaranteed to operate. Guaranteed tours have a special logo and appear highlighted in the tour finder.
- Cruise Requirement: Check this box to indicate that the departure includes a cruise element.
- Private Group: Check this box to signify that the departure is for a private group.
- Mystery Tour: Check this box to classify the departure as a mystery tour. Certain areas of t3 and documentation will not disclose full details of accommodation.
- Allow Agent Web Discount: Check this box to allow discounts on agent WebRes bookings.
Travel Insurance
- Inclusive: Check this box if travel insurance is included in the basic tour price.
- Band: Select the insurance band from the Insurance Rate Table. Refer to the Insurance section in the maintain Toolbar for more information.
- PPI Rate: Passenger Protection Insurance rate (rarely used but included for historical bookings).
- (Commission) Band: Commission band allowable to agents for insurance sales. It can be A, B, or C and corresponds to the rates defined in the Agents setup.
- (Commission) VAT: Check this box to add VAT to agents' commission on insurance sales.
Web Settings
- On Sale: Check this box to indicate that the tour is eligible for sale with WebRes.
- Take Deposits: Check this box to allow deposit payments for internet bookings made before the balance due date.
- Show Seat Picker: Check this box to enable web clients to select their own coach seats.
- Own Insurance Information Required: Check this box to make completion of clients' own insurance details compulsory when insurance is not taken.
- Areas: Optional selling area grouping for use by WebRes. Refer to the WebRes documentation for more details.
- Status: Add a custom tag line to be used instead of "Book Now" on WebRes.
- Discount (Disc.): Specify the discount amount.
- Type (Discount Type): Select the type of discount, used in conjunction with the above
- Promo Code (PC): Click to display a window and specify a WebRes promotional code.
Day Excursion Rates
- Adult/OAP/Child: Set the day excursion rates for adult, senior, and child passengers.
Agent Commission Rules
- Capped: Check this box to set the commission to a fixed amount specified in the Cap £ field.
- CAP £: Specify the commission value per passenger when the Capped option is checked.
- Basic Price Band: Apply the agent commission band to the basic tour selling price. It can be A, B, or C. Refer to the Agent Setup for more details.
- Basic Price VAT: Check this box to add VAT to commission on the basic tour price.
- Allow on Supplements: Check this box to allow agents' commission on tour accommodation supplements. If left unchecked, accommodation supplements will be displayed as non-commissionable items in the booking financial tab.
Other Settings:
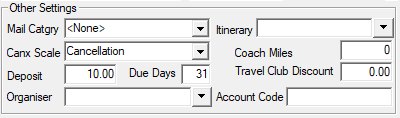
- Canx Scale: Set the scale of cancellation and charges to be used. Cancellation scales allow you to define the charges that apply to a booking, such as the minimum deposit amount, and how much money is returned to the customer in the event of a cancellation. Additional cancellation scales are setup within Maintain -> Settings -> Booking Terms. Numerous different cancellation scales can be setup, allowing you to define the exact charges for each type of tour that you offer (UK, Europe, US, Cruise, Flight, etc)
- Ininerary: Choose a text-based itinerary to be used. Click the select button to choose from those already configured. Once setup, this can then be printed to specific customers
- Itinerary: Choose a text-based itinerary to be used. Click the select button to choose from those already configured.
- Deposit: Override the default deposit amount defined in the selected booking terms scale (see cancellation scale above).
- Due Days: Override the default due date defined in the selected booking terms scale (see cancellation scale above). Please note that this is specified in days rather than weeks as per the booking terms scale.
- Mail Category: Assign a mail category to the tour. Each booking made will be associated with the selected mail category for the lead client.
- Loyalty Points: Specify the number of loyalty points issued when booking the tour. This is only applicable if the loyalty point system is enabled.
- Travel Club Discount: Specify the discount allowed for clients with current travel club membership.
Related Articles
Changing the departure date or duration of a tour
The tour departure date and duration can be changed from the Tour Information section within the Tour Settings window. Simply clicking on the button will load the tour settings and bring up a new window where the departure date and number of nights ...The Tour Finder
The tour browser screen of t3 is the main area for searching for tours, for both managing departures and making reservations. It is accessed by either clicking the tour button on the main tool bar of t3 or by selecting tour from file on the main ...Tour Re-code
Before changing any tour codes ensure any outstanding Cash Daybook and Insurance reports have been printed. Do not use on any Shuttle style tours which have bookings. To change a tour code of an existing tour in t28 you will first need to be logged ...Discounting a tour
With t3, you can create and edit fixed price or variable discounts applicable to bookings through t3, webres or both. Discounts are managed through Maintain > Discounts or from the tours settings if only discounting a single tour. From Discount ...Switching or Sharing Routes on a Tour
Switching or Sharing a Route Routes on a tour can be switched to a different/new instance of a route. The tour can also be attached to a route that is currently in use by an existing tour, so multiple tours are sharing a route Go to the tour settings ...