PHCloud - Driver Application


PHCloud Driver Application - First Use
Here you will find all the steps required to configure your system plus the brand new PHCloud Mobile App with Walkaround and Diary functionality. Please take time to have a good look around and ensure each section is carefully configured to meet your requirements.
Initial Driver Setup
1) Please log into your PHCloud account on a PC, tablet or mobile device.
2) Navigate
to the Resources menu and open the account for the driver you wish to grant access to
the App. Please ensure the driver's email address is populated in the list then
click on the 'Create Account' button next to the PHCloud App Account section. A box will pop-up confirming the drivers invite. Please tick 'Send Invite' and when you're ready to continue click 'Create'.
3) The driver will receive an invite email to the email address that was selected. Please ask them follow this link to create a password for their account. At this stage the driver will be able to login to the Mobile App downloaded in the links at the top of the page or alternatively search for Roeville Driver App in the Apple or Android App Store. ** Please check your junk mailbox if you haven't received this **

For Walkaround Checks see sections 5 - 14 or skip to section 15 for Drivers Diary
Walkaround Checks
5) In PHCloud you will now find a brand new menu item where you can setup new Check Templates and review the latest checks that have been submitted.
6) If you first navigate to Templates and you'll need to create some new ones to match the differing checks you wish to use. We've given you the basis of a legal standard template to begin with. You can use this immediately or create your own one at this stage. Always try
to give the templates suitable names as they will shortly be assigned by name
to all the vehicles in the fleet.
7) With
the main template header created, it is now a simple task to add all the required
questions the driver is expected to answer while carrying out the walkaround. Use the drag icon on the left hand side of the question list to re-order
them into a suitable work-flow order. Repeat the process for any
other templates which might be required.
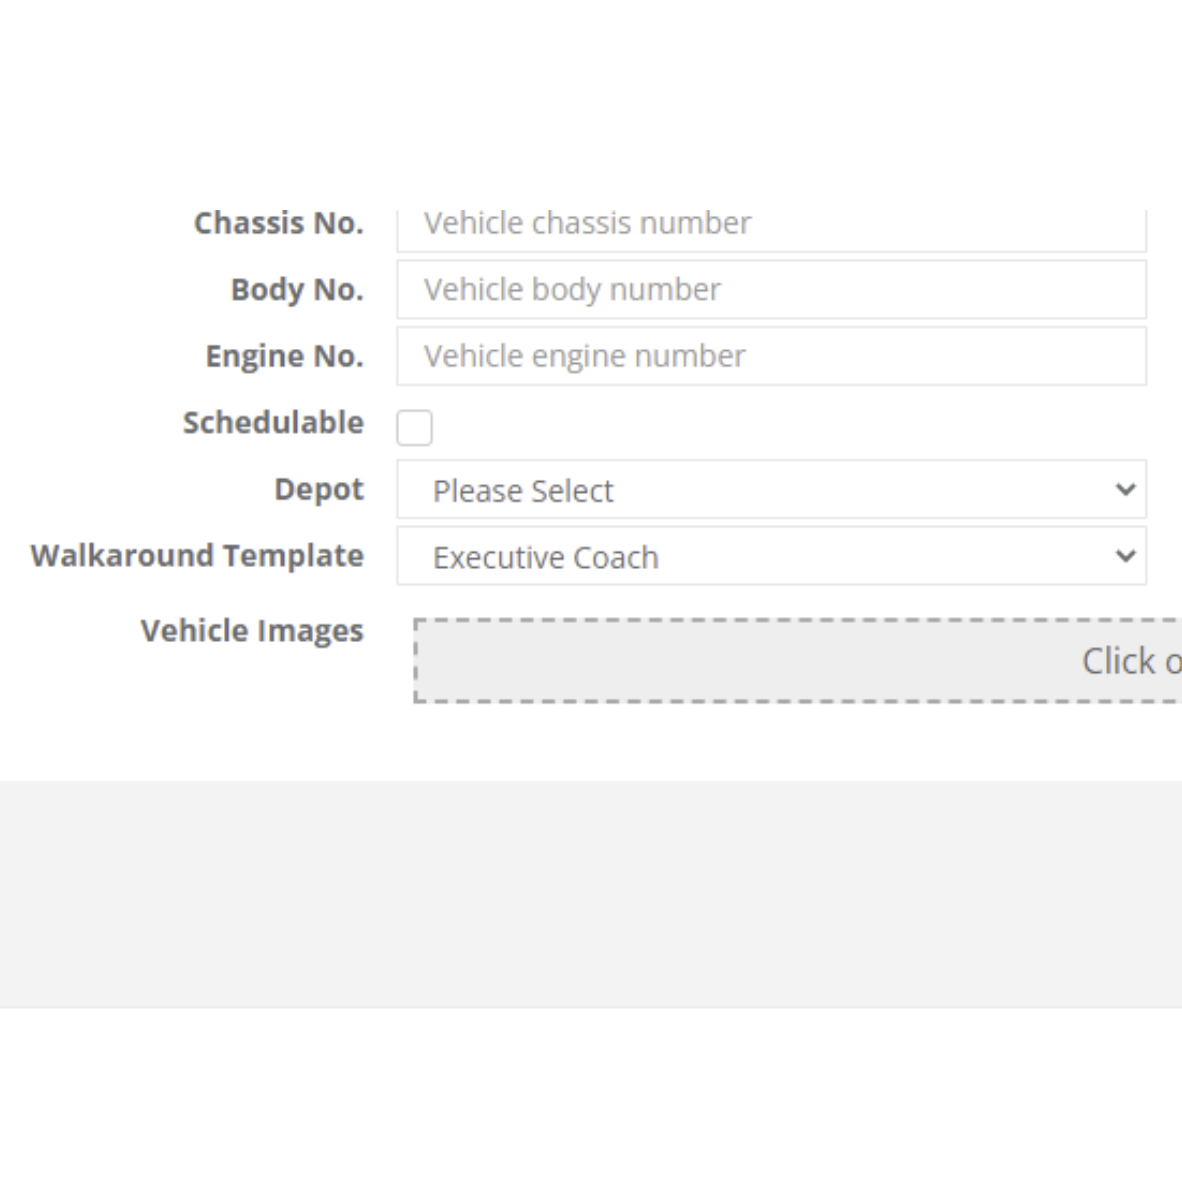
8) Once
the templates are complete they can be assigned to the respective vehicles
from the Resource section of PHCloud. Simply select the appropriate template
for each vehicle.
9) The Walkround Check feature of
the PHCloud App is now ready for use. To initiate a new check the driver
selects the relevant vehicle and enters the current odometer reading. The app
then walks through the series of questions defined in the template presenting the
options to 'pass' the check' or to flag a defect. All defects can have
notes and photograph recorded against them.
Walkaround Check Menu
Please note: When the device is off-line, the PHCloud App can store checks and photographs and submit them at the first available opportunity when connection is re-established.
Walkaround Check Menu
Pass or Defect Questions
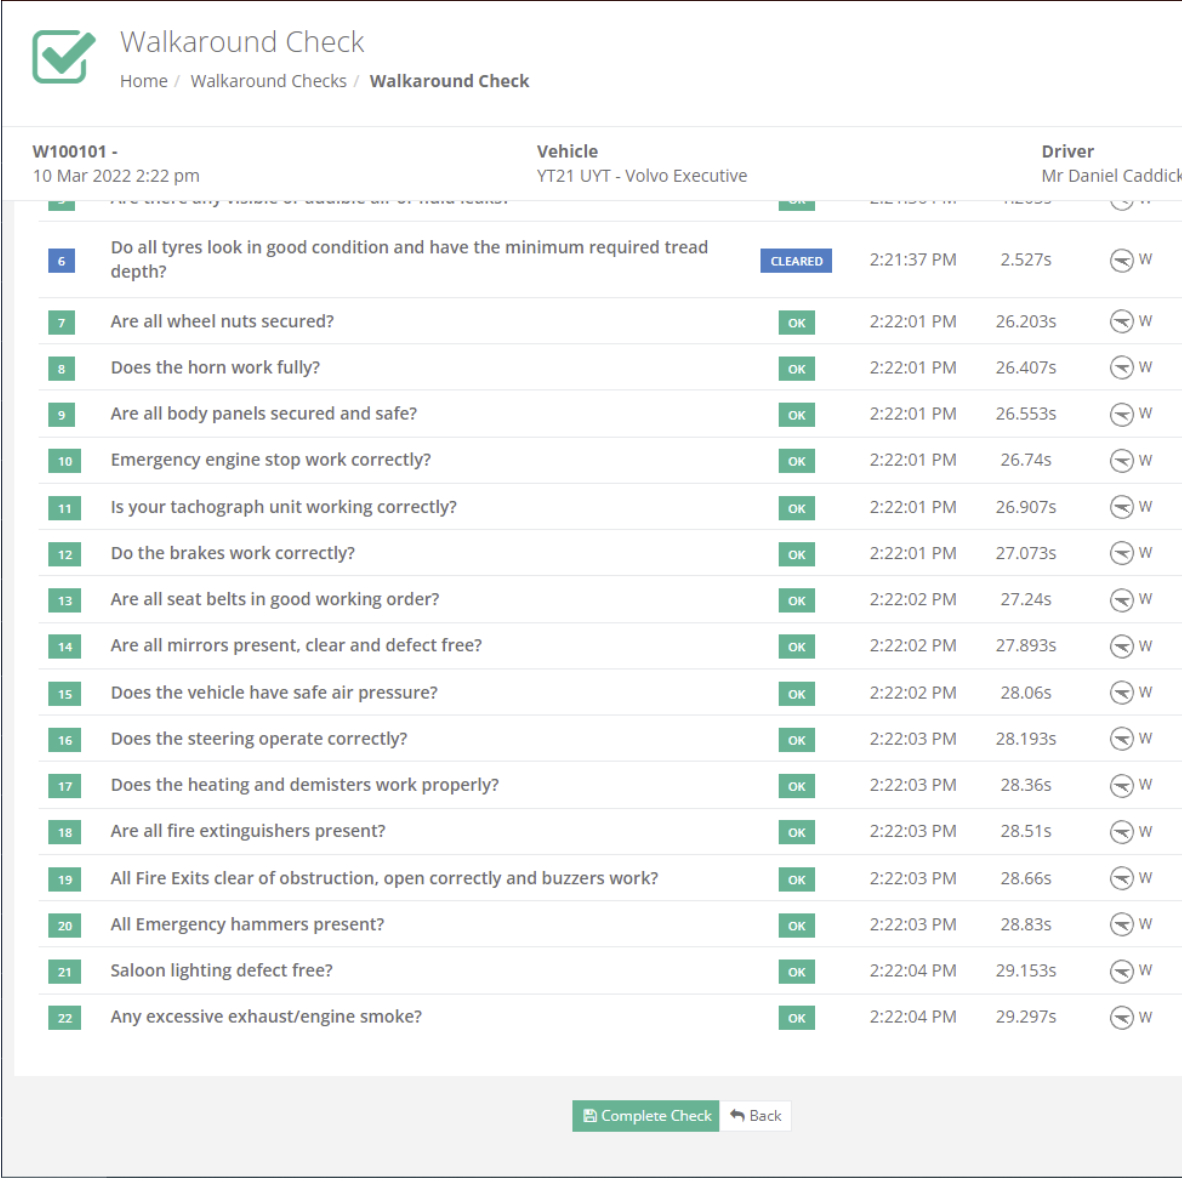
10) Checks can be reviewed from the Walkaround menu in PHCloud by selecting 'checks' and hitting the refresh button to reveal any new checks which may have been submitted since the last refresh.
11) Checks
can be filtered in PHCloud by vehicle and date as well as those which have yet
to be reviewed, ones which contain flagged defects plus those that are
completely clear.
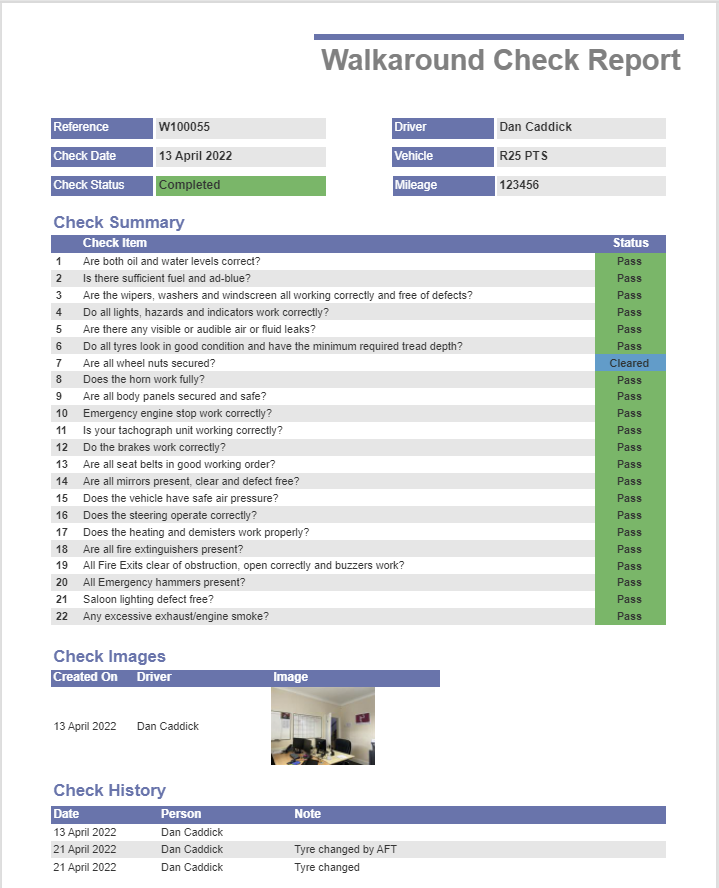
12) Clicking
on a submitted check reveals a full summary of the walkaround, along with
compliance data including the time between each step and the accelerometer
movement of the smart device. It clearly shows any questions having
defects and any associated photographs which were taken and submitted. The
history on the right hand side of the screen shows updates to the check.
You can click print in the top right hand corner and produce a printed summary for the check showing colour coded statuses for defected items.
13) Clicking
on an individual question previews the notes and images in detail, as shown
below. The check can be designated as a 'serviceable defect' meaning that
the coach can continue to run with the issue until it can return for
maintenance work. Alternatively the defect can be marked as resolved. This will
require an explanatory note being entered as evidence that the defect has been
rectified.
14) Once
all the defects on a check have been cleared, there is an option at the bottom
of the screen to 'Complete Check'. This will ask for the name of the competent
person signing off on the check and will then change the status of the entire
check to green and cleared.
Drivers Diary
15) The enhanced drivers diary section in PHCloud allows jobs to be 'pushed' out to drivers mobile devices once as part of the scheduling process. This then allows drivers to see upcoming work, view pickup and drop-off details as well as access mapping of the exact locations for pickup-points all on their smart device. Furthermore, the operator receives instant confirmation that the driver has received and acknowledged the work.
In the driver scheduling section of PHCloud's diary overview screen. a new 'Sent' column indicates that a job has been transmitted to the scheduled driver. This acts in a traffic light manner, providing a visually indication as to whether a driver has been sent/received/acknowledged the work.
 Not yet sent to driver
Sent to driver but not yet confirmed
Driver has confirmed receipt of job
16) To transmit multiple jobs to the driver, use the bulk select options on the left hand side of the screen to select those drivers you wish to receive jobs. Then select 'Send Jobs to Drivers'. from the drop down 'bulk actions' menu. This will immediately change the Sent Status to amber. Please note that it can take up to 60 seconds for anything sent or changed within PHCloud to then show on the drivers smart device.
Some drivers may not have smart devices/phones and will wish to receive printed work tickets manually by hand. As can be seen on the menu below we continue to support the option to confirm drivers job acceptance manually in the bulk action menu. This also changes the status colour to green to record the fact the driver has been issued manual paperwork.

Jobs must be confirmed to qualify for pushing to show on the Drivers App. In the booking there is a Confirmed/Provisional status at the very top. This updates automatically with receipt of payment. If the job is not showing to your drivers, please check to ensure it has been confirmed.
17) In the Drivers App, the driver will now have a notification in the footer bar whenever there is work to accept, and can navigate to the diary menu and review/accept the job.
18) Once clicked on a job a series of tabs (Info, Points, Notes* & Extras*) becomes visible as shown below. *these appear only if information is available*
Info shows general job information such as number of passengers, customer, luggage requirements and vehicle.
Points shows a list of all the pick-up/drop-off point information, times and also a link to open the entire route in the devices local mapping application by clicking 'Get Directions'. This also enables the driver to see the exact location of the pick-ups where the operator has dragged and dropped the point when creating a booking. We highly recommend the Google Maps app is available for Route Mapping.
Notes and Extras show information from the booking, but only when such detail is provided.
Clicking the blue 'Confirm' button at the top of the screen confirms to the office that the job is acknowledged and accepted, and moves it into the confirmed list on the app.
Job Info Screen
Point Information Screen
Notes Screen
Once the blue 'confirm' button at the top of the App screen has been pressed, and after the next refresh of the diary overview screen in PHCloud, the Sent Status for the confirmed jobs will change to green.
Thank You
We hope these new features will provide our customers with a fantastic addition to the PHCloud experience, as well as reducing the reliance on third-party applications and additional costs.
It is a further indication of our commitment to the Coach Travel Industry and heralds more new and exciting developments and integrations which are yet to come.
As always we value your feedback and suggestions so please let us know what you think!
Roeville Reservations Software
Related Articles
Unable to Save a Booking - 'Times must be in chronological order'
If you see the error message 'Times must be in chronological order' in the PHCloud application, it means there is a conflict between the timing of the route and the position of the coach not being possible for the coach to carry out. To resolve this ...How to make a Driver Inactive
Drivers that have been created in PHCloud are not able to be permanently deleted. This is for historical purposes. We can however mark them as inactive so that they can no longer be scheduled. Any driver that has been marked as inactive but is still ...Adding driver or vehicle events
To create a new event and mark a driver or vehicle as unavailable within PHCloud, follow these steps: Video Example [Click Here] Step 1: Access the "Resources" Section Open the "Resources" section for PHCloud Navigate to the "Resources" section using ...Creating a new booking
When using PHCloud, you can create bookings for various types of travel, including one-time or infrequent trips between different locations. These bookings commonly involve events such as weddings, airport transportation, or any other occasion that ...Walkaround Checks
A walkaround check is a crucial safety procedure that must be performed on all coaches before each journey. This procedure ensures that the vehicle is in a safe condition and free from defects that could jeopardize the safety of passengers and ...