Bulk Allocation/Transfer System
Bulk Allocation/Transfer System
Purpose
The purpose of the new Bulk Allocation System in T3 is to allow for a faster and more efficient way of transferring large numbers of passengers from a 'master' tour, used for the purposes of initial sale onto subsequent operational coaches. Using the traditional method of the individual booking transfer could take days if several hundred passengers are involved. The new tool changes this to hours and cuts down on the administration required by around 80%.
Example Scenario
You are an operator looking to sell several coaches to London from multiple different sales regions. You want the flexibility to work out your transport routes closer to the date of operation to allow for more cost-effective use of vehicles.
You setup a Master tour with all pick-up points available across multiple regions. The seat plan is set to 'None' and customers book on along with selecting their required options (theater tickets etc). The single master tour keeps selling simple and enables for a clean WebRes setup if used. Sales continue until a few weeks out from departure and now you have 400+ people all on one tour ready for routing and transfer to the operational tours.
If you use our T3 Routing products then working out your most efficient routes is extremely simple in T3 Routing Application. If not you now need to print off the list of points from the master tour and work out your picking routes from the points that you have sold. Lets say for example your 400 people work out most efficiently to 9 different routes into London. You should have setup a minimum of 8 operational tours (if you plan on re-using the master tour as an operational tour. If not then setup 9) and these can be setup at the same time as the master tour (if estimating the number you will need) or later at the time of routing.
We now have the exact scenario the new tool was designed for. Using the existing booking transfer function for even just 100 passengers having to remove and re-apply options would take a considerable amount of time. So lets see how the tool helps.
Allocation Window Summary
The allocation window is divided into 5 main sections as below:


Top Left - Operational
This section displays all the different Hubs in use by the selected tours. Left-clicking on a hub will highlight and show a tick in the Tours to Allocate window pointing to which tours are on that Hub. A Right-click will open the Hub properties window
Top Centre - Tours to Allocate
This area shows all the individual tours that you have selected to work with. We show the brand, tour reference, title, number of passengers, seat plan, Seat share status, Availability, size, Hub Id, Option shares and Accommodation shares. Left-clicking on a tour will highlight the same vehicle on the right-hand side vehicle section. Right-clicking will open up a menu of different options for that tour.
Bottom Left - Route or Pickup Point
This section shows all of the routes that are setup on that Hub. In the allocation and transfer process we use these routes to group the passengers together for the coach on which they are being transferred to. This will be explained further below. Left-click and hold will allow you to drag every passenger grouped on that route and drop them on a new vehicle on the right-hand side Vehicles section. Right click and select edit route to jump straight into Routing Lite and make changes to routes and pickups.
Bottom Centre - People on Route or at PickupPoint
This area displays the passengers on the highlighted group in the Route or Pickup Point section. We show the booking and tour reference, A tick if there is a front seat option type against that passenger, the seat number if allocated, pax name and coach request.
Right-Hand - Vehicles
This final area displays each tour and highlights if any seat shares are in place. Double-clicking on any of the tour/vehicle tiles opens up the seat allocation tool that allows you to quickly seat any passengers that have been transferred/allocated.
How it works
Preparation
1) Head to the main Routing icon and then from the next window select Allocation
2) The following window asks you to select all tours involved in the transfer. Use Shift to easily select multiple tours that are all together or the Ctrl key to multi-select different tours regardless of their position in the list. Once every tour has been highlighted click Select
3) The tours are now all added into the allocation window below
4) We now need to ensure that all of your operational coaches are on the same Hub as the master tour. If there is only one Hub showing in the top left Operational window then it may have already been done when creating the tours. If not you'll need to highlight all of the operational tours in the Tours to Allocate window, right-click and select Change Hubs. This will allow you to quickly attach these empty tours to the same hub as the master tour.
It's a good idea if you're changing Hubs to rename your master hub first so that it's easier to select the correct one. This can be done by Right-clicking
It's a good idea if you're changing Hubs to rename your master hub first so that it's easier to select the correct one. This can be done by Right-clicking
5) Any operational tours where passengers will be moved to from the master tour will need to share their accommodation and options with said master tour. This can be done in a single action by right-clicking on the operational tour in the Tours to Allocate section and selecting Share Resources
this will open a configuration window allowing you to select the resources you wish to share (in this example accommodation and options) and to select from the drop-down list the master tour you wish to share with.
If multiple brands are in use then this tool can also be used to share the seat plans. Please note you will have had to set the Seatplan Master for all the master tours first.
Routing
1) Now that all pickups are under a single hub you can use T3 Routing App or Routing Lite to split off the pickups into Routes that represent the operational coaches the passengers will be moved onto. If you plan to split 150 passengers onto 3 different operational coaches then in Routing App or Routing Lite you should now create 3 seperate routes with the appropriate pickup points. We recommend naming the routes the operational tour code to make it easier for the allocating in the next stage.

Once complete your passengers are now all ready for transferring
Transfer/Allocation
1) If you left-click on any of the route groupings on the left-hand Route or Pickup Point section and take a look at the list of passengers that appears in the bottom centre you will see they should all have the tour code where they currently sit. This should be the master tour.
2) Left click and hold to drag the group and drop it onto the tour in the Right-hand side Vehicle section that you wish to transfer the passengers to. You should immediately see the tourcodes change to the new tour. The passengers have instantly been transferred in bulk in a few seconds.
3) Now repeat for the remaining groups until all pax have been moved. You can now click on each group to check that the passengers show the correct tourcode.
4) We can now double click on the first vehicle on the right-and side to open up the seat allocation window. Here you will see the seat plan for the tour in question and all the unseated passengers in the window below
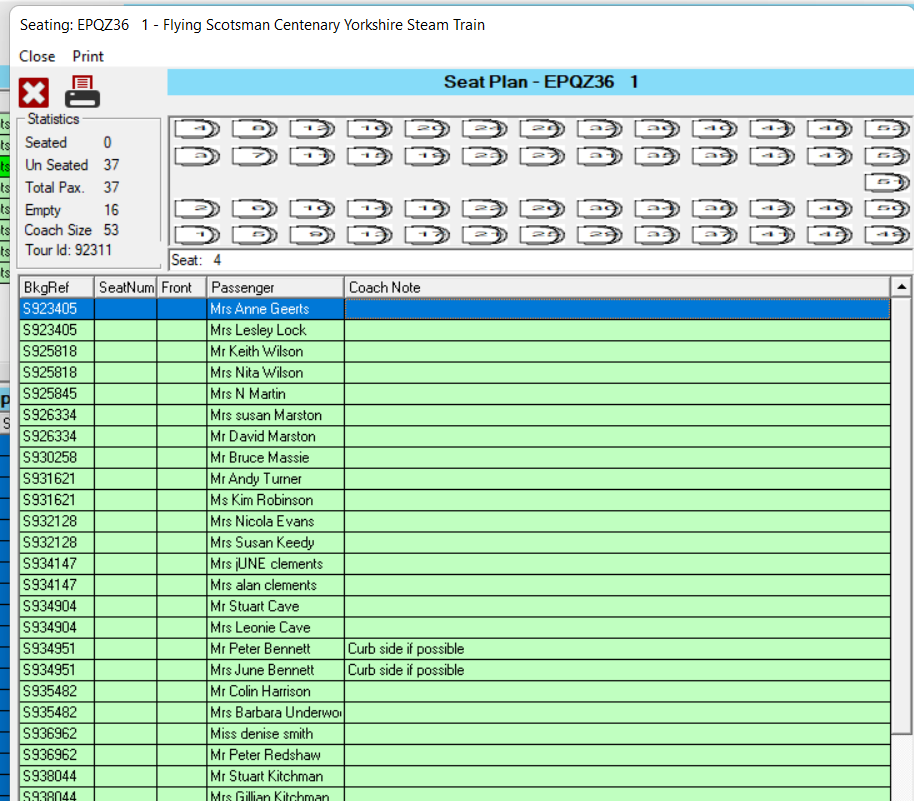
5) select the top passenger in the list and then click on the seat you wish them to sit in. The next passenger is automatically selected and you can continue to click on the required seating and place passengers where needed. You will see the list at the bottom updates with the seat that has been allocated
6) Rinse and repeat for the remaining seatplans and you're done!
Checklists
Quick checklist to ensure you're following the correct order of operations!

Single Brand
Prep
Prior to and including Routing
- Ensure all tours are shared on the same Hub so that transport can use T3 Routing Application or print off a list of all points for routing.
- Either using T3 Routing or Routing Lite pickup's should be split into routes on the hub that define the tour those passengers are to be transferred to. We recommend naming the Route the tour code of the operational coach.
- Ensure all accommodation on all operational tours are shared with the master tour
- Ensure all options on all operational tours are shared with the master tour
- Ensure any operational tours have been allocated a seatplan and are no longer set to seatplan NONE
Post Routing
- Confirm you only have a single Hub in the top right-hand window
Allocation
- Left-click and hold on the route group in the bottom left-hand section. You will see a list of passengers in that route now appear in the bottom centre section. TourRef should show the master tour reference.
- Drag those passengers over and drop them onto the vehicle/tour on the far right-hand side where you wish to transfer them to. You should see the reference change for all the passengers to the new tourcode.
- Do this for all Routes in the Route or Pickup Point section
- Once done click on each route individually and check that the tour codes match the new tour they have been transferred onto.
- Once you're happy now move to the right-hand vehicle list and double click on the first tour. You will see the seat plan and a list of unseated passengers below
- Click the first passenger in the list and then click on the seat you wish to place them in. The selected passenger automatically jumps to the next one to be allocated so you can simply continue clicking in the appropriate seat. You are finished once the window below the seat plan is empty.
- Do this for all remaining tours/vehicles.
- Voila! You have now allocated 10's or 100's of passengers in a matter of minutes.
It is up to you at this stage if you want to remove the accommodation or option shares. Please note once removed you would need to setup again should you wish to go back and adjust the transfers using the allocation tool.
Dual Brand
Prep
Prior to and including Routing
- Ensure all tours are shared on the same Hub so that transport can use T3 Routing Application or print off a list of all points for routing.
- Either using T3 Routing or Routing Lite pickup's should be split into routes on the hub that define the tour those passengers are to be transferred to. We recommend naming the Route the tour code of the operational coach. If the operational coaches are to have a mix of passengers from several different brands then these route groups should have two tour codes in the name.
- Ensure all accommodation on all operational tours are shared with the master tour
- Ensure all options on all operational tours are shared with the master tour
- If multi-branding then seat plan shares between the relevant operational coaches should also now be setup. Ie Brand 1 Coach 1 should be shared with Brand 2 coach 1 and so on.
- Ensure any operational tours have been allocated a seatplan and are no longer set to seatplan NONE
Post Routing
- You should now detach any separate brands off onto their own Route. As a rule of thumb, post routing you should now have the same number of hubs in the top left Operational window as you do brands involved. So 2 brands would mean 2 hubs with all tours in the top centre Tours to Allocate window showing as grouped on the correct hub for each brand.
Allocation
- Left-click and hold on the route grouping on the bottom left-hand side. You will see a list of passengers in that route now appear in the bottom centre section. TourRef should show the master tour reference.
- Drag those passengers over and drop them onto the vehicle/tour on the far right-hand side where you wish to transfer them to. You should see the reference change for all the passengers to the new tourcode.
- Do this for all Routes in the Route or Pickup Point section
- Once done click on each route individually and check that the tour codes match the new tour they have been transferred onto.
- Once you're happy now move to the right-hand vehicle list and double click on the first tour (if using shared seat plans then click on the vehicle that is setup as the master). You will see the seat plan and a list of unseated passengers below. If a shared plan you will see passengers across all shared vehicles.
- Click the first passenger in the list and then click on the seat you wish to place them in. The selected passenger automatically jumps to the next one to allocated so you can simply continue clicking in the appropriate seat. You are finished once the window below the seat plan is empty.
- Do this for all remaining tours/vehicles.
- Voila! You have now allocated 10's or 100's of passengers in minutes.
It is up to you at this stage if you want to remove the accommodation or option shares. Please note once removed you would need to setup again should you wish to go back and adjust the transfers using the allocation tool.
Related Articles
t3 Routing
The following guide covers the basics of how to set up and manage routing in t3. The feature allows for the implementation of building routes from basic point to point to full interchange style pickup schemes (ones where multiple tours share the same ...Bulk Invoicing
In PHCloud, you can streamline your invoicing process by issuing a single invoice for multiple bookings. This feature simplifies bulk-invoicing for better efficiency and organization. Bulk Invoicing Step 1: Access the Bookings Tab 1. Begin by ...t3\t4 System Requirements
Workstation Server Network Workstation Workstation Minimum Processor Computer with processor compatible with Intel Core i3 or faster RAM 8 gigabyte (GB) or more Operating System Microsoft Windows 11 Professional Hard disk space 20 GB of available ...Creating Tours
The following Article will take you though the process of creating a tour and also explaining all the available options that can be utilised to create your Day Excursions/Inclusive Tours Preparation Before creating tours it is strongly recommended ...Diary View
The diary view feature provides a convenient and centralized location where you can easily access information about vehicle departures, destinations, assigned drivers, job progress, and customer details. By default, this page displays all vehicles ...